 |
How-To Use |
| INSTRUCTIONS and INSTALLATION TIPS – |
 |
|
FauxToys
Wraps for Open Cars, including |
| GENERAL
INSTRUCTIONS for All Open Cars |
|
Protecting the Wraps (Optional Step) - FauxToys wraps are reasonably tough and water-resistant. However handling the wrap with wet hands will leave permanent fingerprints in the gloss surface. Two coats of common paste wax will give increased protection to the surface. See Details. Cut Out Wraps - Cut out all paper parts. You can use scissors, or a hobby-knife and metal straightedge for the outside edges. The openings on the hopper car will require a knife and straightedge. Darken the Edges - Working from behind, darken the edges with a black marker or a marker of the color the edge will be bordering. If a proper color marker is not available, color the edge black or leave it white, depending on which is the least obvious. For
GONDOLA
CARS,
continue reading. |
| GONDOLA
CARS (Low Side) |
 |
Sides Only - The bulged ends on Marx® gondola cars makes a full wrap impossible, so only side panels are provided. You will have to use a car with end panels of a similar color, or else repaint the car to match the wrap. Clean or Repaint car and frame, if necessary. Cleaning and Painting Tips . Cut and Darken the Panel Edges- See General Instructions above. |
|
TEMPORARY INSTALLATION - Bend the black tabs at the panel bottom sharply backward. It may help if you use a ruler and ballpoint pen to score the line between the tabs and the panel, on the back of the sheet. Slide the top of the panel under the rolled edge, and tuck the tabs between the frame and the gondola body. If the rolled upper edge is too tight, try sliding the panel in from the end of the roll. If it still will not go, create a roll-opening tool. If the body is too tight on the frame for the panel tabs to slip between them, look underneath the frame, and loosen the metal tabs that hold the body onto the frame VERY SLIGHTLY. The panel should now be tight enough to use in regular operation, held in place by the friction of the frame and body. |

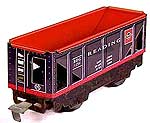
| HIGH-SIDE GONDOLAS and HOPPER CARS |
 |
Hopper and High-side Gondola wraps have the same shape and are interchangeable. The difference is that Hopper bodies have a template to cut the openings under the slope of the bin. If you are building a high-Gondola, simply ignore steps relating to the template and cutting the openings. Read and Follow the General Instructions above. Clean or Repaint car and frame, if necessary. Cleaning and Painting Tips . |
 |
The Hopper Template - You will use the grey hopper template to mark the hopper wrap for cutting. For a traditional Marx look, cut out both the white and light grey areas of the template. For a simpler cutting job, and a more realistic look, cut out only the white parts. (We recommend that you do not cut the small ladder holes - they are a lot of work and almost never come out straight. The wrap has a ladder illustration anyway.) When the openings in the template have been cut, then cut the template from the sheet. |
|
Mark the Hopper Openings - Align the BOTTOM edge of the template with the bottom of the car sides. Use the openings in the template to mark where to cut on the wrap. A fine point felt pen works well for this. Cut the Openings - Use a sharp hobby knife and a metal straightedge to cut the openings. Take your time and use the template marks and the printed details to keep the ruler straight and square. Cut out the wrap - And darken the edges as mentioned above. Each wrap piece has four short black lines coming into the color from the edge. Fold the wrap sharply at the points marked by these lines to form the side and end. Slide the wraps up under the rolled edge of the car side. If the roll is too tight, trim the wrap to fit, or see the blue box in the GONDOLA section above. TEMPORARY MOUNTING - Use double-stick tape to stick the full-width end over the short end with the copyright notice. Do not stick the wrap to the car. To remove the wrap, pull the ends apart at the tape. Use a fresh piece of tape when reinstalling. |
 |
PERMANENT MOUNTING - Once you have test-fitted the wrap, remove it and put Scotch® Double-Sided tape along the bottom edge, and 1/4-inch from the top edge of the side, and along the middle of the side. Do not tape across the folds. Put tape on the end edges, and trim off any overlap. For hopper cars, run tape along the diagonal edge at the bottom of the slope. If you cut the ladder holes, make sure that you do not block them with tape. |
|
PAINTING TIPS FOR OPEN
CARS Inside the Bin - When painting the inside of the bin, you will need to mask off the outside of the car. This is easily done with index cards, slipped up under the rolled bin edge and taped to one another. Under the Hopper Bin - Before applying the wrap,you may wish to remove the bin of a non-valuable hopper car and repaint the underside of the bin to match the wrap. The car is held together with small metal tabs. Make sure you loosen them the minimum amount to allow you to remove the bin. Bending the tabs unnecessarily can cause them to break off. MORE ABOUT TABS. |
|
|
Hop
the Fast Freight to other Instruction Pages |
|
|
Take
the Express |
How
to Order |
|
All
text, photos, and artwork are COPYRIGHT©2003 by David Helber. "Marx"
is a registered trademark of Marx Toys, Inc. and Marx Trains. |